 Save to Pinterest
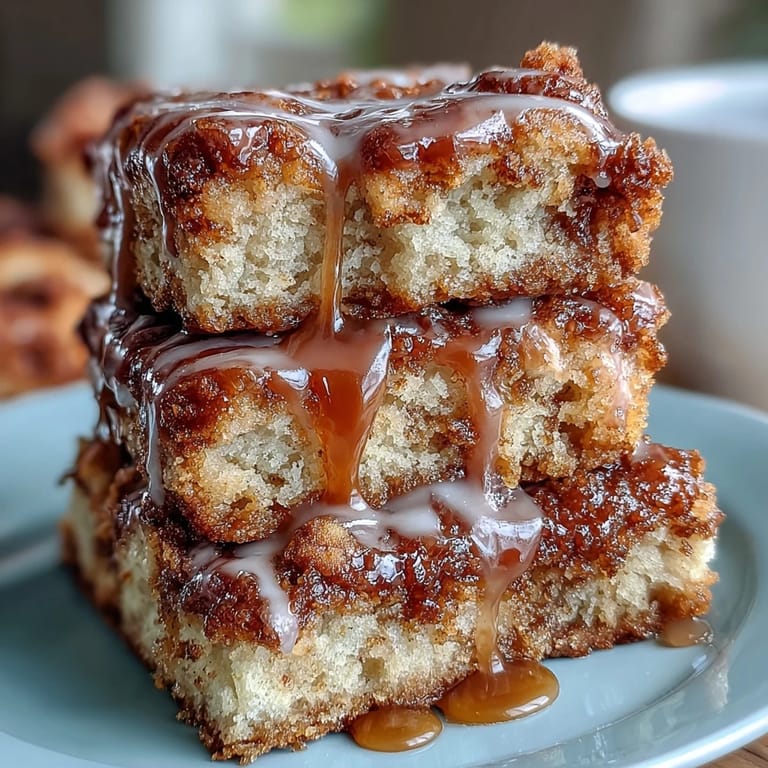
 The smell of maple syrup hitting hot pancakes will always stop me in my tracks, but there is something about having that warm maple flavor in a soft, cakey bar that feels like discovering a secret shortcut to happiness. My apartment neighbor used to make something similar on Sunday mornings, and the scent would drift through the hallway vents, making it impossible to stay in bed. After months of casual hints and probably too many obvious compliments, she finally shared her method with me over coffee. I have tweaked it over the years, but that first bite still takes me back to cold mornings wrapped in blankets, waiting for the oven timer to ping.
Last fall I made a triple batch for my friends birthday brunch, standing in my tiny kitchen with flour dusted everywhere and sticky glaze on my fingers. When everyone went silent after the first bite, just chewing and making approving sounds, I knew I had found something special. One friend actually asked if I could make them for her wedding instead of a traditional cake, which I took as the highest possible compliment.
Ingredients
- 2 cups all-purpose flour: The foundation of everything, providing structure while keeping the bars tender and light.
- 1 cup granulated sugar: Sweetens the batter without overpowering the delicate maple notes we want to shine through.
- 1 tablespoon baking powder: Gives these bars their signature lift, creating those airy pockets that make each bite feel cushiony.
- 1/2 teaspoon salt: Balances all the sweetness and wakes up the warm spices so they actually taste like something.
- 1/2 teaspoon ground cinnamon: Adds that familiar cozy background warmth that pairs so beautifully with maple.
- 1/4 teaspoon ground nutmeg: A tiny amount goes a long way, adding depth and complexity without tasting like holiday potpourri.
- 1/2 cup unsalted butter melted: I learned the hard way that melted butter makes these bars more moist and dense than creaming softened butter would.
- 1 cup whole milk: Creates richness and tenderness, though I have used buttermilk in a pinch with great results.
- 2 large eggs: Bind everything together while contributing to that fluffy, cake-like texture we are after.
- 1 teaspoon vanilla extract: Do not skip this, it bridges the gap between the maple and spices beautifully.
- 1/2 cup maple syrup: Use the real stuff here, it makes a noticeable difference in both flavor and depth.
- 1 cup powdered sugar: Creates that smooth, glossy glaze that sets perfectly on top of the cooled bars.
- 1 to 2 tablespoons milk: Adjust this to get your glaze to just the right pouring consistency, thick but still flowy.
- 2 tablespoons maple syrup: This is what makes the glaze taste like maple instead of just sweetened milk.
Tired of Takeout? 🥡
Get 10 meals you can make faster than delivery arrives. Seriously.
One email. No spam. Unsubscribe anytime.
Instructions
- Get your oven ready:
- Preheat to 350°F and grease your 9×13 pan thoroughly, or use parchment paper with overhang for easy removal later.
- Whisk the dry team:
- In a large bowl, combine the flour, sugar, baking powder, salt, cinnamon, and nutmeg until everything is evenly distributed.
- Mix the wet ingredients:
- In a separate bowl, whisk together melted butter, milk, eggs, vanilla, and maple syrup until the mixture looks smooth and glossy.
- Bring them together gently:
- Pour the wet ingredients into the dry and fold with a spatula just until combined, stopping as soon as you no longer see dry flour streaks.
- Spread and bake:
- Transfer the batter to your prepared pan, smooth the top with an offset spatula, and bake for 25 to 30 minutes until golden and a toothpick comes out clean.
- Cool completely:
- Let the bars rest in the pan for 10 minutes, then move them to a wire rack to cool entirely before glazing.
- Make the maple magic:
- Whisk powdered sugar with 1 tablespoon milk, adding more as needed to reach thick but pourable consistency, then stir in the maple syrup.
- Glaze like you mean it:
- Drizzle the glaze back and forth over the cooled bars, letting it drip down the edges naturally.
- The final touch:
- Let the glaze set for 10 to 15 minutes before slicing, and maybe drizzle extra maple syrup on top if you are feeling indulgent.
 Save to Pinterest
 My roommate started requesting these whenever she had a bad day at work, something about the combination of warm spices and sweet maple glaze just made everything feel manageable again. We would sit on the couch with warm bars and talk about nothing important until the stress of the day faded away. Food has this magical ability to comfort us in ways that nothing else can, and these bars became our little ritual.
Making Them Ahead
I have discovered that these bars actually taste even better the next day, once the flavors have had time to settle and get cozy with each other overnight. You can bake the bars up to two days in advance, store them tightly wrapped at room temperature, and glaze them right before serving for maximum freshness. If you want to go even further, the unglazed bars freeze beautifully for up to three months, just thaw them overnight and add the glaze in the morning.
Serving Suggestions
While these bars are perfect on their own with a cup of coffee, I have found they become absolutely next-level when served slightly warm with a scoop of vanilla bean ice cream melting over the top. For brunch, try cutting them into smaller squares and serving alongside fresh fruit to balance out the richness. The maple glaze also plays nicely with a dollop of tangy Greek yogurt or sour cream on the side if you want something that cuts through all that sweetness.
Storage and Keeping
After much experimentation with different storage methods, I have found that an airtight container at room temperature keeps these bars perfectly fresh for about three days. Any longer than that and they start to dry out slightly, though they are still absolutely edible, just not as pillow-soft as day one. If you need to keep them longer than three days, pop them in the fridge and they will last another few days, though I recommend warming them for 15 seconds in the microwave before eating.
- Place a piece of parchment paper between layers if you are stacking them.
- Avoid storing them near strong-smelling foods because they absorb odors easily.
- If the glaze gets sticky in humid weather, a quick 10-minute stint in the fridge firms it right up.
 Save to Pinterest
 Hope these maple donut bars bring as much comfort to your kitchen as they have to mine over the years. Happy baking.
Recipe FAQs
- → Can I use maple extract instead of maple syrup?
Yes, you can add 1/2 to 1 teaspoon of maple extract to the batter or glaze to intensify the maple flavor. However, keep the maple syrup in the batter as it provides necessary moisture and sweetness that extract alone cannot replace.
- → How should I store these maple bars?
Store the bars in an airtight container at room temperature for up to 3 days. If you need to keep them longer, refrigerate for up to a week, though they may become slightly denser. Bring to room temperature before serving for the best texture.
- → Can I freeze these maple donut bars?
Absolutely! Wrap individual bars tightly in plastic wrap and place in a freezer-safe bag. Freeze for up to 3 months. Thaw at room temperature for 2-3 hours. Note: the glaze may become slightly sticky after freezing, but the flavor remains excellent.
- → Why did my bars turn out dense?
Dense bars usually result from overmixing the batter, which develops too much gluten. Fold the wet and dry ingredients together just until combined—some small lumps are fine. Also ensure your baking powder is fresh and you measured the flour correctly, using the spoon-and-level method.
- → Can I make these gluten-free?
You can substitute a 1:1 gluten-free flour blend for the all-purpose flour. The texture may be slightly different but still enjoyable. Ensure your other ingredients, particularly baking powder and vanilla extract, are certified gluten-free.