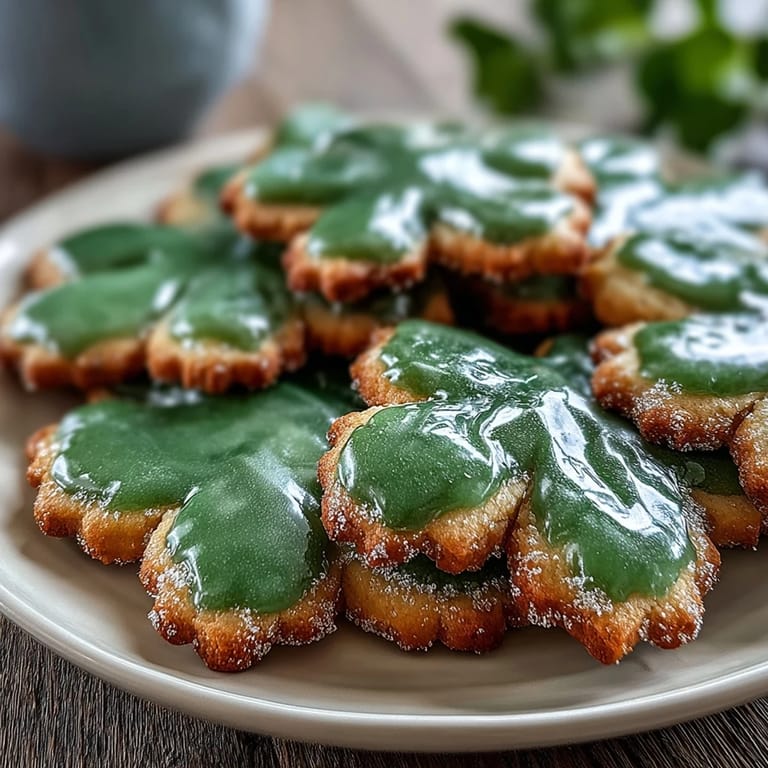
 Save to Pinterest
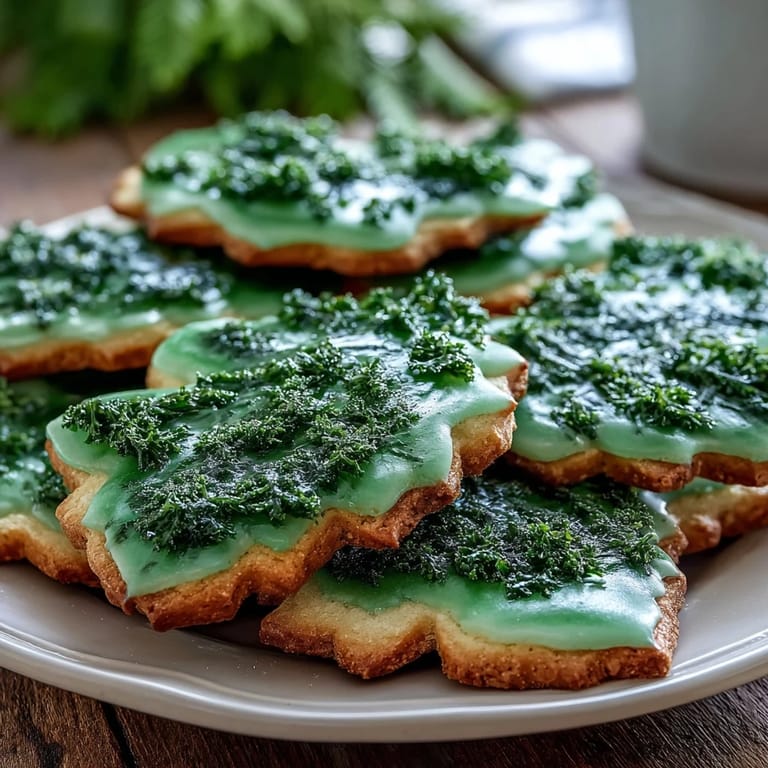
 My kitchen smelled like butter and anticipation the March morning I decided to make shamrock cookies from scratch. A friend had texted asking what I was bringing to her St. Patrick's Day gathering, and instead of buying something, I found myself pulling out my mixer at dawn. There's something about green icing on a shamrock shape that makes you feel like you're creating tiny edible luck. By the time the first batch came out of the oven, golden and perfect, I knew this would become my go-to celebration cookie.
I'll never forget handing a box of these to my coworker Sarah, who grew up in Dublin. She opened it at her desk, and her whole face lit up in a way that had nothing to do with the flavor and everything to do with the memory they triggered. That moment taught me that the best recipes are the ones that connect to something deeper than taste, especially when they carry cultural meaning.
Ingredients
- Unsalted butter (1 cup, softened): The foundation of tender, buttery cookies that melt slightly on your tongue; make sure it's truly soft to avoid lumps in your dough.
- Granulated sugar (1 cup): Creates the structure and sweetness, so don't skimp on creaming it with the butter until it looks like pale sand.
- Large egg (1): Acts as your binder and adds richness; bring it to room temperature for smoother mixing.
- Pure vanilla extract (1½ teaspoons): Use real vanilla, not imitation, because it makes a noticeable difference in the final flavor profile.
- Almond extract (½ teaspoon, optional): Adds subtle depth and an almost nutty undertone if you choose to include it; skip it if you prefer a pure vanilla cookie.
- All-purpose flour (2¾ cups): The structure of your cookie, so spoon and level it carefully rather than scooping directly from the bag.
- Baking powder (½ teaspoon): Provides gentle lift without making the cookies too cake-like or fluffy.
- Salt (½ teaspoon): Balances the sweetness and brings out the vanilla flavor in surprising ways.
- Powdered sugar (3 cups, sifted): Forms the base of the royal icing; sifting it removes lumps that can ruin the smooth finish.
- Meringue powder (2 tablespoons): Stabilizes the icing and helps it dry hard; this is what makes royal icing different from buttercream.
- Warm water (4 to 5 tablespoons): Controls the consistency of your icing, so add it gradually and adjust as needed for piping.
- Green gel food coloring: Gel colors are more vibrant and don't thin out your icing like liquid colors do.
Tired of Takeout? 🥡
Get 10 meals you can make faster than delivery arrives. Seriously.
One email. No spam. Unsubscribe anytime.
Instructions
- Cream the butter and sugar:
- In a large bowl, beat softened butter with granulated sugar using an electric mixer on medium speed for 2 to 3 minutes, until the mixture is pale, fluffy, and resembles the texture of thick frosting. You'll know it's ready when it leaves a trail when you lift the beaters.
- Add wet ingredients:
- Beat in the egg, vanilla extract, and almond extract if using, mixing until everything is fully combined and the batter looks smooth. Don't rush this step; a minute or two of mixing ensures the egg is properly incorporated.
- Combine dry ingredients:
- In a separate bowl, whisk together flour, baking powder, and salt to distribute the leavening evenly. This prevents pockets of baking powder that could create uneven rising.
- Bring it together:
- Gradually add the dry mixture to the wet ingredients while mixing on low speed, stopping as soon as you don't see streaks of flour. Overmixing can make cookies tough, so resist the urge to beat it into submission.
- Chill the dough:
- Divide the dough in half, flatten each portion into a disc about half an inch thick, wrap tightly in plastic wrap, and refrigerate for at least 1 hour or until the dough is firm enough to roll without sticking. This resting time helps prevent the cookies from spreading too much while baking.
- Preheat and prepare:
- Heat your oven to 350°F and line two baking sheets with parchment paper. Cold baking sheets prevent the cookies from browning too quickly on the bottom.
- Roll and cut:
- Lightly flour your work surface and roll out one disc of chilled dough to about ¼-inch thickness, working quickly so it doesn't warm up too much. Using a shamrock-shaped cutter, cut out shapes and place them about 1 inch apart on the parchment-lined sheets.
- Bake to perfection:
- Bake for 8 to 10 minutes, watching for the edges to just begin turning golden; the centers should still look slightly underbaked. Remove them when they still look a tiny bit soft in the middle, as they'll continue cooking slightly from residual heat.
- Cool properly:
- Let the cookies rest on the baking sheet for 5 minutes so they set slightly, then transfer them to a cooling rack to cool completely before decorating. Warm cookies are still too tender for icing.
- Prepare royal icing:
- Combine sifted powdered sugar, meringue powder, and vanilla extract in a clean bowl, then add warm water one tablespoon at a time while beating on low speed. You're aiming for a consistency that forms stiff peaks but is still pipeable, thick enough to hold its shape but thin enough to spread smoothly.
- Color and pipe:
- Tint the icing with green gel food coloring, adding just a few drops at a time until you reach your desired shade of festive green. Transfer to a piping bag fitted with a small round tip and outline each cooled cookie, then flood the centers with icing, smoothing as needed.
- Add your finishing touch:
- While the icing is still wet, you can add sprinkles, pearl dust, or other decorative touches if you like. Let everything dry completely, which usually takes 2 to 4 hours depending on humidity.
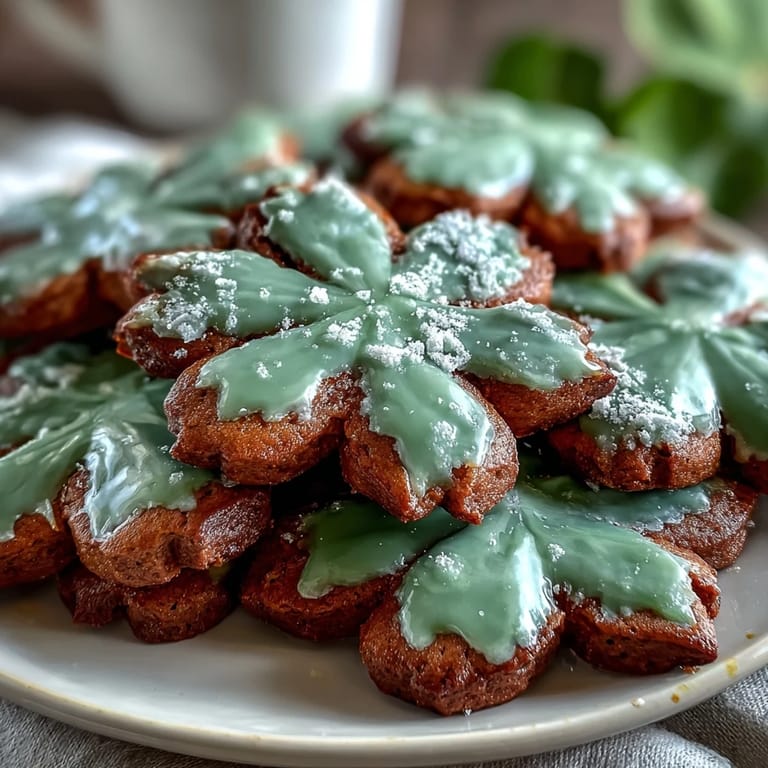
 Save to Pinterest
 One year I made these cookies in February just to have something green in the house during a particularly gray winter week, and my family ate them all before St. Patrick's Day even arrived. Since then, I've learned that these shamrocks don't have to wait for a holiday to brighten your mood.
Flavor Variations Worth Trying
Once you've mastered the basic recipe, you can experiment without changing the structure at all. Swap the almond extract for lemon zest to create a bright, citrus version, or add a teaspoon of finely grated orange zest for something more sophisticated. I've also tried replacing half a teaspoon of vanilla with a tiny pinch of peppermint extract for a holiday twist that felt unexpectedly festive. The beauty of this dough is that it's a blank canvas, so feel free to get creative with what you pair with the cookie itself.
The Art of Cookie Decorating
Royal icing can seem intimidating, but it's actually quite forgiving once you understand what you're aiming for. The key is watching the consistency: when you lift the beaters, the peaks should stand up tall but then slowly curl over at the tips, like a wave about to break. If you add too much water, you can always mix in a bit more powdered sugar; too thick, and a tiny splash of water fixes it. I've learned that room temperature matters here too, so if your kitchen is warm or humid, your icing will take longer to dry, which is actually fine because you get more time to pipe details before it sets.
Storage and Gift-Giving Tips
These cookies keep beautifully for up to a week in an airtight container, and the hard royal icing actually protects them from drying out. I've shipped boxes of these cookies across the country wrapped in parchment paper and nestled in tissue, and they arrive looking almost as perfect as when they left my kitchen. The decorating aspect makes them feel handmade and special, which is why they're my secret weapon for last-minute gifts or why I always have a batch hanging around during March.
- Layer cooled, fully decorated cookies between sheets of parchment paper in a sturdy container to prevent icing from cracking.
- If you're mailing them, wrap the whole container in bubble wrap and choose a padded shipping box to absorb any jostling.
- These make exceptional edible favors for parties because guests can actually eat them, unlike most decorative cookies.
 Save to Pinterest
 Every time I pull out my shamrock cutter, I'm reminded that the best recipes are the ones that bring people together and create small moments of joy. These cookies do exactly that, and they're worth making not just for St. Patrick's Day but whenever you want to add a little green magic to your kitchen.
Recipe FAQs
- → How can I make the cookies softer?
Avoid overbaking by removing the cookies as soon as the edges start turning golden, then allow them to cool on the baking sheet for 5 minutes.
- → What gives the royal icing its stiff consistency?
Meringue powder combined with powdered sugar and careful addition of water creates stiff, pipeable peaks perfect for detailed decoration.
- → Can the almond extract be substituted?
Yes, try lemon or orange zest instead for a different flavor twist while maintaining a fresh, aromatic note.
- → How should I store the cookies after decorating?
Allow the icing to dry completely, then store the cookies in an airtight container at room temperature to preserve freshness and decoration.
- → What tool is best for cutting the shamrock shapes?
A shamrock-shaped cookie cutter ensures clean, consistent shapes that hold detail during baking and decorating.